
Portable workshop network with OpenWRT
When giving location independent workshops, you never know what kind of network setup you will encounter. Most venues will provide Internet access through Wifi, but what about hosting presentations on that network? MQTT brokers? File sharing? I don’t like to have the workshop’s outcome depend on the firewall policy of the venue, which is why I carry a setup with me that provides me with a peace of mind.
Overview
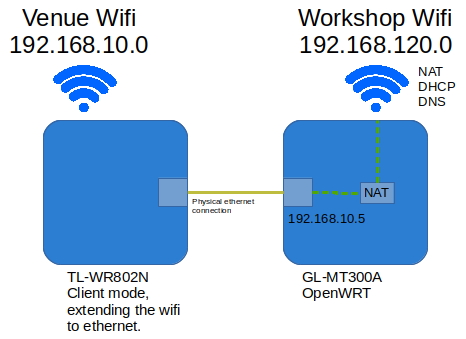
The setup consists of two portable mini travel routers connected together with an Ethernet cable. The first router is set to “client mode” (as named by option in the router) making it a bridge between Wifi and Ethernet, extending the Venue Wifi services to the cable.
The second router connects to that Ethernet, becomes a member of the Venue Wifi and then hosts an isolated network Workshop Wifi, allowing flexibility in terms of network services together with Internet access to the network members.
Requirements
The requirements for the Workshop Wifi are:
- Custom Wifi name and password (Wifi credentials)
- Control addresses lease pool (DHCP)
- Isolate Workshop Wifi from Venue Wifi (NAT/Firewall)
- Assign sensible hostnames to machines with static ip (DNS)
Hardware
TL-WR802N
This is the first router I bought for the setup before a knew better. It’s an affordable tp-link router which in this case serves as a provider of cabled Internet. Besides saying it works in client mode to achieve that, I don’t want to focus more on how to set it up for it’s using some proprietary system and compared to the GL-MT300A is quite close.
The second iteration of the system will involve getting rid of this router for another GL-MT300A.
GL-MT300A
I will not hide it, I am amazed by the amount of openness and customizability this device offers. The GL-MT300A costs between 20-30Eur, comes with OpenWRT preinstalled, a simplified web interface for basic setup and additional accessibility through SSH and UART access.
The steps below explain how to achieve the desired setup starting with a GL-MT300A with factory settings.
Setting up the GL-MT300A
First contact
Once you power the device for the first time it will start a Wifi network GL-MT300A-xxx (where xxx is the last three digits of the devices MAC address). You can see additional details imprinted on the back of the device.
The admin portal in accessible in two ways:
-
ga09af2.gl-inet.com(URL also imprinted on the device) which for my case resolved intohttp://192.168.178.39:83. This is the subnet which the GL-MT300A is connected to with a cable.192.168.178.39was the address leased to GL-MT300A by an external DHCP service. -
192.168.8.1which is accessed from theGL-MT300A-xxxWifi. For this subnet the DHCP service is running on the GL-MT300A. This approach doesn’t require you to insert the serial number of the device to log and is the only way to access the advanced OpenWRT options.
Accessing the admin interface for the first time prompts you for some basic setup information and starts the main GL admin page. Clicking on Advanced settings and logging in opens up Luci, the web interface for OpenWRT.
Wifi credentials
To change the SSID and password to something that suits you better go to Network -> Wifi and select edit for the listed GL-MT300A-xxx SSID.
Just below in the Interface Configuration block is a field ESSID with which you change the network name with. In my case I changed it to Workshop.
And under the Wireless Security tab, text field Key is responsible for changing the key.
The encription defaults (WAP-PSK/WPA2-PSK Mixed Mode) worked for me.
DHCP
The DCHP service for the Workshop Wifi is attached to the bridge interface called br-lan. You can check it out by going to Netwrok -> Interfaces -> (br-lan) Edit.
Checking under the Physical settings you can see that the bridge connects the VLAN Interface: "eth0.1" and the Wireless Network: Master "Workshop". Long story short, and concluded from experiments and not understanding, br-lan is the interface to setup DHCP on for the machines that will connect to Workshop Wifi.
In the Common Configuration -> IPv4 address set the static ip that corresponds to the desired network address. I set mine to 192.168.120.1 with a netmask 255.255.255.0. This leaves me with addresses 192.168.120.2 - 192.168.120.254 available to clients.
However I am going to need some ip ranges available for static ip assignment and would like the DHCP service to lease addresses only in the range 192.168.120.100 - 192.168.120.250.
Which is the default setup.
Very convinient defaults.
NAT/Firewall
NAT and Firewall setup ended also being set by default, no additional setup was required there. Pinging a machine on Workshop Wifi (192.168.120.0) from a machine on Venue Wifi (192.168.10.0) isn’t possible, and the when doing it the other way around the source address is masked as the routers address.
Requirements passed, no additional setup needed.
DNS
The goal is allowing every new machine that joint the Workshop Wifi to resolve presentation to 192.168.120.50 without any additional setup. Just typing presentation in your browser should take you to the web page hosted by a server running on 192.168.120.50.
To achieve this go to Network->Hostnames and add the appropriate hostname/IP pair. In my example Hostname: presentation and IP address: 192.168.120.50. Restart the router and test it out with ping presentation from one of the machine is the Workshop Wifi.
Conclusion
The GL-MT300A showed of as an open and customizable device with excellent defaults. In combination with the TL-WR802N which might end up being replaced with a more customizable router, it provides a good mechanism for an easily to set up sand boxed network with Internet access.
So far it has successfully served multiple times providing a maximum of 15 simultaneous clients with Internet and access to subnet resources such as an HTTP server and a Jupyter notebook. For the next iteration I would look for an OpenWRT supported device that has two embedded radios to try minimize the size. Until then this will fulfill the purpose for the workshops to come.